Advanced Bank Reconciliation in D365 Finance
I love the Advanced Bank Reconciliation feature in Microsoft Dynamics 365 Finance and do you know why? With out of the box functionality we can quickly import bank statements, automatically match the banking transactions, post bank fees and be done with it in just a couple of minutes.
What does this mean?
This means that by simplifying and automatizing these processes you will find that this solution will clear almost all of your banking transactions, leaving just a small amount for user intervention.
Example:
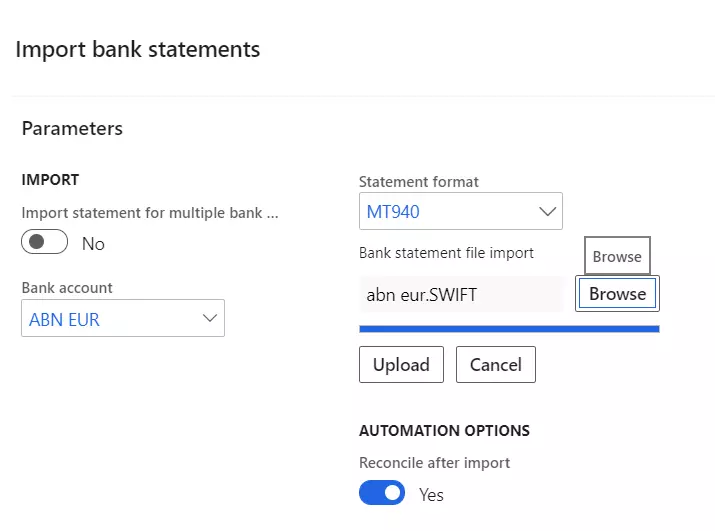
Step 1: You import your bank statement
Go to: Bank Management Workspace > Import Bank Statements . Make sure you have Reconcile After Import set to Yes.
Step 2: Wait a couple of seconds and voilá:
a) the Bank Statement is automatically created and validated (if there were any errors we would see it in the notification bar)
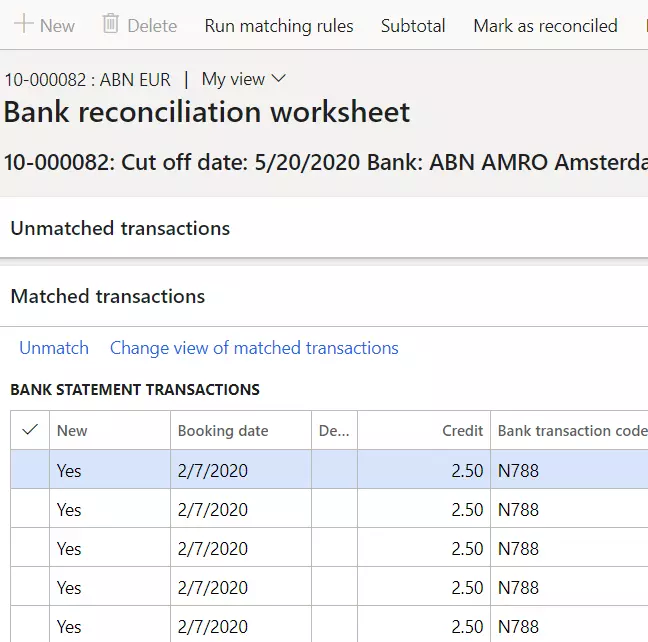
b) The Bank Reconciliation is automatically created
c) The Matching Rules set have run automatically so no need to manually reconcile these transactions
Next steps would be:
1) Check if there are any transactions that still needs manual reconciliation
2) Post the bank fees via the Bank Statement form
3) Click in Mark als Reconcileand you are done!
What about the setup, is it complex?
Even though we can add more complexity to the setup, I would like to show you in this document that with very simple setup you can have this functionally up and running while keeping all the benefits.
Configuring Bank Statement Formats
The setup for bank statement import varies, depending on the format of your electronic bank statement. Dynamics 365 supports three bank statement formats out of the box: ISO20022, MT940, and BAI2. More often than not, we use MT940 and BAI2.
Configuring Cash & Bank Parameters
In Cash & Bank Parameters you will find some basic settings. Personally, I like to activate Show Statement Line in Debet/Credit. This setting will allow the bank statement transactions to be shown in two separate Debit and Credit columns. If not selected, the amounts will be shown in the same column with the appropriate sign.
Nevertheless, all these settings are optional.
Reconciliation Matching Rules
Now we have reached my favorite part of the setup, where the magic happens!
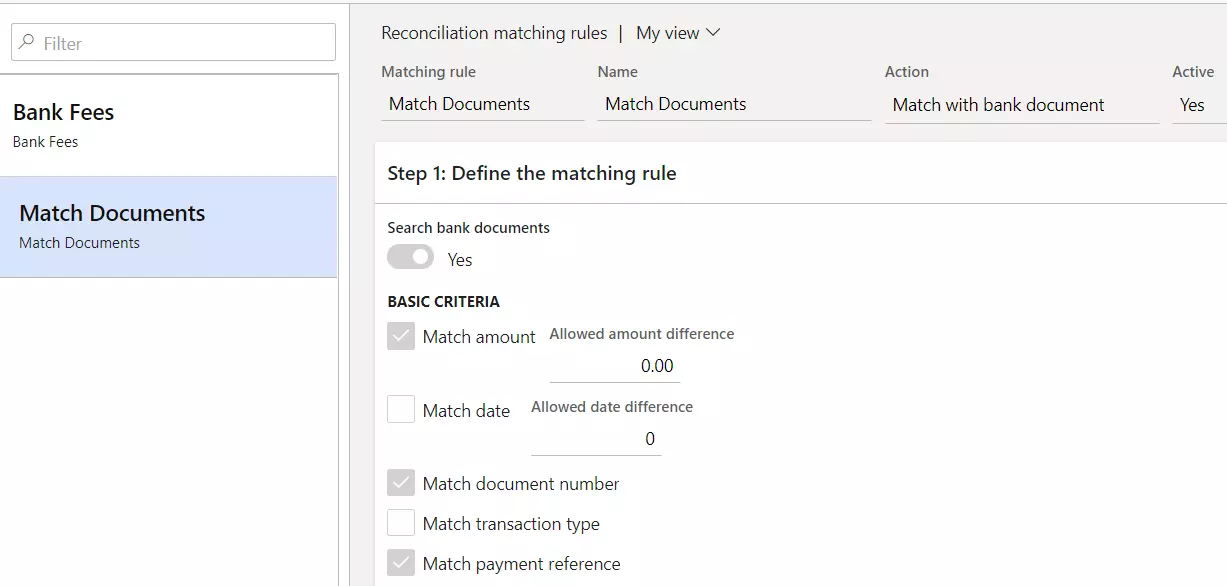
A reconciliation matching rule is a set of criteria that is used to filter bank statement lines and bank transaction lines during the reconciliation process.
In this case we have set up two simple matching rules:
1. Bank Fees – By running this rule Dynamics 365 will identify all transactions in the Bank Statement with Bank Transaction Code equal to N788 and “mark them as new”. This means that these transactions are new to the system so we can now directly post these transactions to a cost ledger account.
2. Match Documents – Based on criteria such as amount, document number and payment reference, Dynamics 365 will automatically find and match bank statement transactions.
We can have as many matching rules as we like. The more complex they are, the greater the advantages.
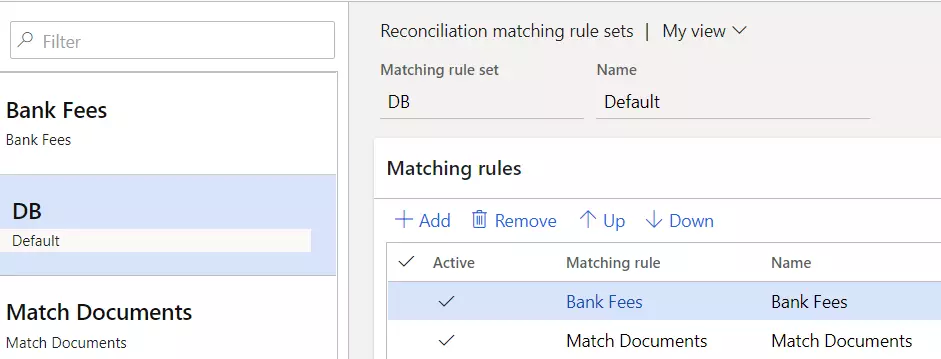
We can also combine these rules into a Reconciliation Matching Rule Set, which allows us to use them in combination:
Configuring Bank Accounts
Finally the piece that glues the setup together: the Reconciliation tab on the Bank Accounts.
Important setup to do:
1. Advanced Bank Reconciliation: Yes
2. Statement Format: Choose the appropriate format for your bank
3. Reconcile After Import: because of this setting the system will automatically:
a) Validate the bank statement,
b) Create a new bank reconciliation and worksheet, and
c) Run the Default matching rule set
4. Default Matching Rule Set: pick the matching rule set that you would like to use by default.
Useful Links:
What’s next?
If you are interested in knowing more about the advantages that this feature will bring to your company, please get in touch! I will be happy to help. Contact me via: ana.marques@dynamicpeople.com or call 020-3032470.


