Custom API
It’s been a year since custom API went live and, I’ve been reading some posts and watching videos from the community about how valuable custom APIs are, but until today, it was just “oh, there’s something new, I have to try that out sometime”.
Two weeks ago we got a new request in a project, so I finally had a chance to try it out and see the potential, the requirement was:
“As a Sales Representative I want to create an Order based on a Quote. This should copy the Data from the Quote Header and the Quote Lines to the Order Header and Order Lines. To clarify, these entities were custom-built,because the business case was more complex than the Out of the Box functionality. And because of the limitations of the native product catalogs, it was better to opt for custom-built entities.
I’m excited because with the custom API we get some more advanced features, such as:
- Private Custom API: It makes the Custom API available only to the owner and the users with whom the owner shares it. Microsoft itself uses this functionality to hide the internal actions and functions. This adds an extra layer of security.
- API-type: We can define our Custom API to run as Function or as an Action. For the Function Type, we need to execute it using GET Method and for Action Type, we can execute it using POST Method. With these types we can call the custom API directly from a Power Automate Cloud Flow from a bound action.
- Codebenadering: Custom API supports Code approach, customizing as much as we want.
When we want to create a custom API, we’ll need three components:
- The plugin
- The custom API and parameters records (we can create these using make.powerapps.com)
- A way to call the custom API, it could be a web resource, a cloud flow or a workflow.
Create the Plugin
So let’s deep dive in the first step. I’ve tried to keep the plugin as simple as possible, delegating all the heavy logic to other procedures and functions.
public class CreateOrderFromQuote : IPlugin
    {
        public void Execute(IServiceProvider serviceProvider)
        {
            ITracingService tracingService = (ITracingService)serviceProvider.GetService(typeof(ITracingService));
            IPluginExecutionContext context = (IPluginExecutionContext)serviceProvider.GetService(typeof(IPluginExecutionContext));
            IOrganizationServiceFactory factory = (IOrganizationServiceFactory)serviceProvider.GetService(typeof(IOrganizationServiceFactory));
            IOrganizationService service = factory.CreateOrganizationService(context.UserId);

            tracingService.Trace("Start Custom API createOrderFromQuote");

            EntityReference quoteRef = new EntityReference(context.PrimaryEntityName, context.PrimaryEntityId);
            var quoteHandler = new Core.Handlers.QuoteHandler(tracingService, service);
            quoteHandler.createOrderFromQuote(quoteRef, context);

            tracingService.Trace("End Custom API createOrderFromQuote");
        }
    }
The Execute procedure calls the createOrderFromQuote procedure which is located in another class. This is the principal method because It will call all the other functions.
What I want to highlight in the createOrderFromQuote procedure is the OrganizationRequestCollection object, because with this object we can create the Order and its lines in a single request.This is way better as the performance is much higher then if we create the Order and its lines one by one.
And this is the procedure that fills the Custom API output parameters:
 public void CreateOrderFromQuote(EntityReference quoteRef, IPluginExecutionContext context)
        {
            _tracingService.Trace("Start QuoteHanlder createOrderFromQuote");

            OrganizationRequestCollection requestCollection = new OrganizationRequestCollection();

            Entity order = _CreateOrderFromQuote(quoteRef, requestCollection);
            _tracingService.Trace($"Order with ID {order.Id} added to Request Collection");

            EntityCollection quoteLinesColl = GetQuoteLinesByQuoteId(quoteRef);
            _tracingService.Trace($"quoteLinesColl : {quoteLinesColl.Entities.Count}");

            requestCollection = CreateOrderLinesFromCollection(quoteLinesColl, requestCollection, order);
            _tracingService.Trace($"requestCollection : {requestCollection.Count}");

            _tracingService.Trace($"Before executeBatchRequest");
            Helpers.Common.executeBatchRequest(_service, _tracingService, requestCollection);
            context.OutputParameters["createOrderSuccess"] = order.Id != Guid.Empty;
            context.OutputParameters["resultMessage"] = "this is a test";
            context.OutputParameters["orderRef"] = order.ToEntityReference();

            _tracingService.Trace("End QuoteHanlder createOrderFromQuote");
        }
Now, in the following piece of code I have two functions that call a handler function named createEntityfromMapping. In this function there is another object that I would like to highlight, it really is a hidden gem that will make our life much easier. The object is InitializeFromRequest,and it allows us to create “in memory” a record with the same field values of the source record, and for this it uses the Field Mapping Functionality between the two entities. If in the future any new field needs to be copied, all the user has to do is create a new field mapping using the relationship between the two entities. There is no need to update the code, how cool is that!
private Entity _CreateOrderFromQuote(EntityReference quoteRef, OrganizationRequestCollection requestCollection)
        {
            Entity order = Helpers.Common.createEntityfromMapping(_service, quoteRef, "dp_order", TargetFieldType.All);
            order.Id = Guid.NewGuid();
            requestCollection.Add(new CreateRequest() { Target = order });
            return order;
        }
 private OrganizationRequestCollection CreateOrderLinesFromCollection(EntityCollection quoteLinesColl, OrganizationRequestCollection requestCollection, Entity order)
        {
            foreach (var quoteLine in quoteLinesColl.Entities)
            {
                _tracingService.Trace($"quoteLineId : {quoteLine.Id}");
                Entity orderLine = Helpers.Common.createEntityfromMapping(_service, quoteLine.ToEntityReference(), "dp_orderline", TargetFieldType.All);
                orderLine.Attributes.Add("dp_orderid", order.ToEntityReference());
                requestCollection.Add(new CreateRequest() { Target = orderLine });
            }
            return requestCollection;
        }
 public static Entity createEntityfromMapping(IOrganizationService service, EntityReference sourceEntityRef, String targetEntityName, TargetFieldType targetFieldType)
        {
            InitializeFromRequest initializeFromRequest = new InitializeFromRequest();
            initializeFromRequest.EntityMoniker = sourceEntityRef;
            initializeFromRequest.TargetEntityName = targetEntityName;
            initializeFromRequest.TargetFieldType = targetFieldType;
            InitializeFromResponse initializeFromResponse = (InitializeFromResponse)service.Execute(initializeFromRequest);
            return initializeFromResponse.Entity;
        }
With the following function I can retrieve all the quote lines into a collection which I‘ll use later to create the order lines:
private EntityCollection GetQuoteLinesByQuoteId(EntityReference quoteRef)
        {
            string fetchXML = $@"<fetch version='1.0' output-format='xml-platform' mapping='logical' distinct='false'>
              <entity name='dp_quoteline'>
                <attribute name='dp_quotelineid' />
                <filter type='and'>
                  <condition attribute='dp_quoteid' operator='eq' uitype='dp_quote' value='{quoteRef.Id}' />
                </filter>
              </entity>
            </fetch>";

            return Helpers.Common.getDatabyFetchXML(_service, fetchXML);
        }
Then in the next function I make use of the collection of quote lines from the previous function to create all the order lines. Again making use of the InitializeFromRequest object,which uses the field mapping between the two entities (Quote lines and Order lines):
private OrganizationRequestCollection CreateOrderLinesFromCollection(EntityCollection quoteLinesColl, OrganizationRequestCollection requestCollection, Entity order)
        {
            foreach (var quoteLine in quoteLinesColl.Entities)
            {
                _tracingService.Trace($"quoteLineId : {quoteLine.Id}");
                Entity orderLine = Helpers.Common.createEntityfromMapping(_service, quoteLine.ToEntityReference(), "dp_orderline", TargetFieldType.All);
                orderLine.Attributes.Add("dp_orderid", order.ToEntityReference());
                requestCollection.Add(new CreateRequest() { Target = orderLine });
            }
            return requestCollection;
        }
Using the handler function createEntityfromMapping we have created the Order and its lines “in memory”. We now are able to process the OrganizationRequestCollection using another handler function called ExecuteBatchRequest. This function uses the executeMultipleRequest object and with this the orders and its lines get created in just one request. After the request has successfully completed we can fill the Custom API output parameters:
public static void ExecuteBatchRequest(IOrganizationService service, ITracingService tracingService, OrganizationRequestCollection requestCollection, int split = 50)
        {
            String exceptionMessage = String.Empty;
            List<List<OrganizationRequest>> splittedLists = requestCollection.ToList().ChunkBy(split);
            tracingService.Trace($"Splitted {requestCollection.Count} into {splittedLists.Count} List with split setting of {split}");
            int i = 1;
            foreach (List<OrganizationRequest> listRequests in splittedLists)
            {
                OrganizationRequestCollection newRequestCollection = new OrganizationRequestCollection();
                newRequestCollection.AddRange(listRequests);
                ExecuteMultipleRequest execRequest = new ExecuteMultipleRequest()
                {
                    Settings = new ExecuteMultipleSettings()
                    {
                        ReturnResponses = true,
                        ContinueOnError = true
                    },
                    Requests = newRequestCollection
                };
                try
                {
                    tracingService.Trace($"Execute Multiple Request {i} of {splittedLists.Count}");
                    ExecuteMultipleResponse responseWithResults = (ExecuteMultipleResponse)service.Execute(execRequest);
                    tracingService.Trace($"Multiple Request Executed. Is faulted : {responseWithResults.IsFaulted}");
                    i++;
                }
                catch (Exception ex)
                {
                    tracingService.Trace($"Error {ex}");
                    exceptionMessage += ex.Message;
                }
                finally
                {
                    if (!String.IsNullOrEmpty(exceptionMessage))
                    {
                        tracingService.Trace($"Exception: {exceptionMessage}");
                    }
                }
            }
        }
Compile the project and we upload the assembly using the plugin registration tool using the option “Register New assembly”. For now we don’t need to create any plugin steps.
Create the custom API
Now let’s look how at the second step. Withing a solution we do the following:
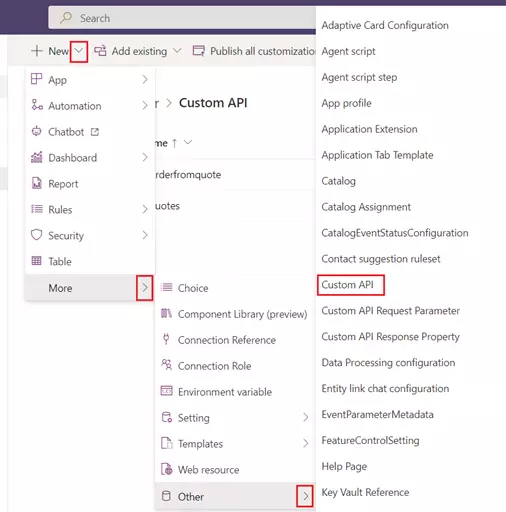
We have to select Custom API and then a classic form is opened where we create the custom API.
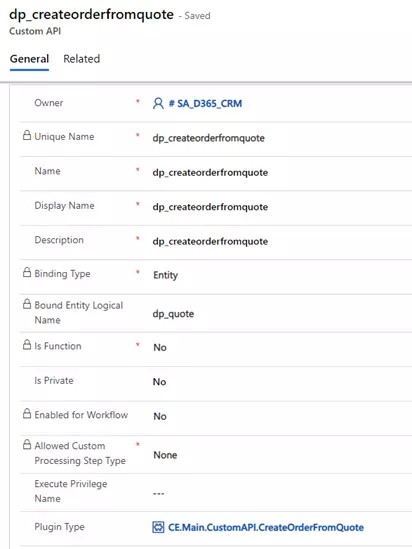
We have to give a unique name to the Custom API, and in my case I wanted to link it to the custom entity dp_quote. Note that if you want to call the Custom API from a workflow, the field “enabled for workflow” should be set to Yes. And finally in the last field “Plugin Type” we have to select the assembly generated in the previous step:
Then we have to create the custom API’s parameters. In this case I only had 3 output parameters, which I defined in the plugin. So to create the parameters we have to do the following:
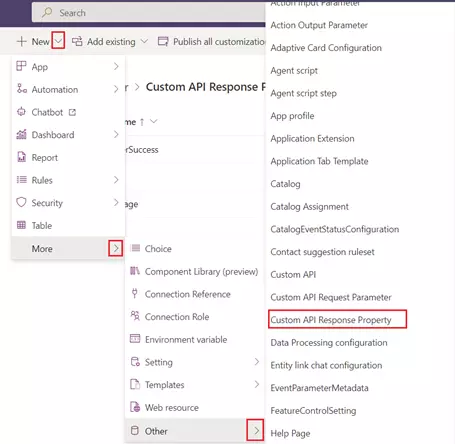
We have to select Custom API Response Property and then a classic form is opened ready to let us create the parameter.
We have to give a unique name to the parameter, and we have to link it to the custom API created in the previous step. Note that is important to give the correct data type to the parameter:
Create a component to call the custom API:
The last step is to create a way to call the custom API. It could be a workflow, a cloud flow or in my case a button. I’ve created a button which calls a JavaScript function and inside this function we call the custom API.
In my case I’ve created a TypeScript project which is configured to auto generate the JavaScript files when the project is compiled.
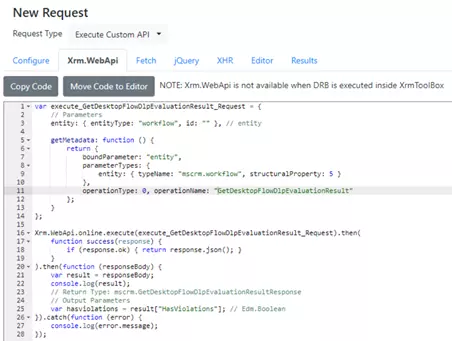
And in order to not reinvent the wheel, I used the Xrm ToolBox plugin called “Dataverse REST Builder” to generate the JavaScript code to call the custom API:
Once the “Dataverse REST Builder” is open, we have to do the following:
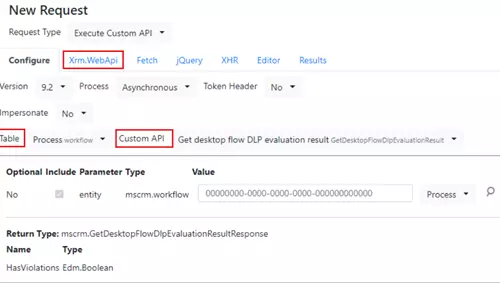
We select the “Execute Custom API” option.
Then in the right side of the screen, we have to select the table and the custom API that we’ve just created. In my case I select dp_quote as the table and dp_createorderfromquote as the Custom API, finally we have to click the tab Xrm.WebAPI right away.
And then you will see JavaScript code that looks similar to the following:
If you have a JavaScript project, just copy and paste the code in a JS web resource of your Dataverse environment, but in my case I had to change it first a little bit, because as I said it before I had a TypeScript project:
export async function approve (primaryControl: Xrm.FormContext) {
        console.log('Function approveReject called');
        if (!primaryControl) {
            console.log('Primary Control not present, abort');
        }
        const formContext = primaryControl;
        let recordId = formContext.data.entity.getId();
            recordId = recordId.replace("{","").replace("}","");
            callCustomAPICreateOrderAndOrderLines(recordId);

        formContext.data.refresh(true);
    }

 export function callCustomAPICreateOrderAndOrderLines(quoteId : string) {
        console.log('Function callCustomAPICreateOrderAndOrderLines called');
        return new Promise<Xrm.ExecuteResponse>(function (resolve, reject) {
            const execute_dp_createorderfromquote_Request = {
                // Parameters
                entity: { entityType: "dp_quote", id: quoteId }, // entity

                getMetadata: function () {
                    return {
                        boundParameter: "entity",
                        parameterTypes: {
                            entity: { typeName: "mscrm.dp_quote", structuralProperty: 5 }
                        },
                        operationType: 0, operationName: "dp_createorderfromquote"
                    };
                }
            };

            Xrm.WebApi.online.execute(execute_dp_createorderfromquote_Request).then(
                function success(response) {
                    if (response.ok) {
                        response.json().then(function (results) {
                            const createOrderSuccess = results["createOrderSuccess"];
                            const dp_orderid = results["orderRef"]["dp_orderid"];
                            const odatatype = results["orderRef"]["@odata.type"];
                            const resultMessage = results["resultMessage"];
                        });
                        resolve(response);
                    }
                }
            ).then(function (responseBody) {
                var result = responseBody;
                console.log(result);
            }).catch(function (error) {
                console.log(error.message);
                reject(error);
            });
        });
    }
And after compile the TypeScript project, finally the JavaScript file is auto generated, so I published the code as a JS web resource in my Dataverse environment.
Call the JavaScript function from a button
The final step is to call the JavaScript function from a button. We will use the Ribbon Workbench tool. Keep in mind that we have to pass a CRM parameter called primaryControl to the JavaScript function.
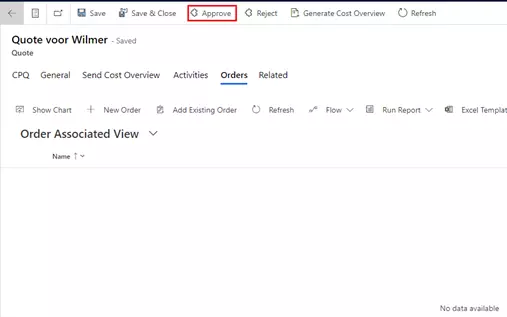
Now that the button is created we can finally test our custom API! In my model driven app I’ve opened a Quote and I press in the Approve button we just created:
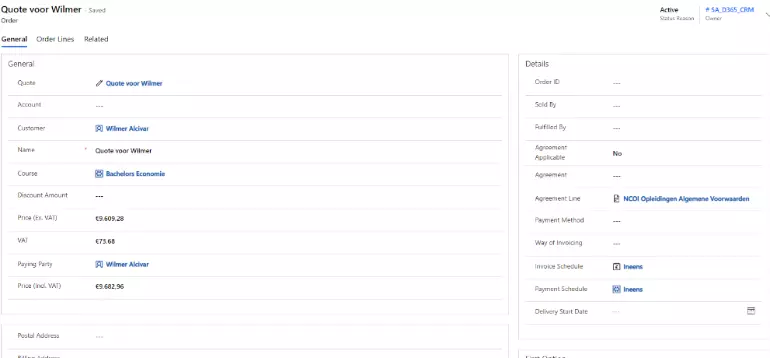
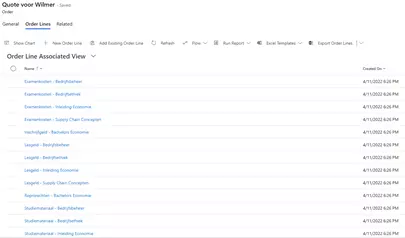
Now the order record and the order lines are created:
This is the order:
And these are its lines:
Conclusion
Custom API indeed is the new and advanced way of registering the Custom Messages on Dynamics 365 / Dataverse with the code approach. In the future I will be using Custom API, and not a custom action, the next time I need “custom action” functionality.
But it is also important to mention that we have to pay attention to our server-side code. because The custom API is a plugin and we have to make it as performant as possible, not only because of the 2 minute execution limit, but also because is a good practice to make a server-side code performant. That’s why in the server side code I have used a fast and efficient way to create multiple records in a single request.
I would like to thank Niels Minnee who helped me applying this new cool feature to solve the business requirement in the best way possible.


