This blog is only available in English
Integration Azure Function with Dynamics 365 using Web API
How to integrate Azure Function with Dynamics 365? In this article we will explain from a technical side how to register an application, how to receive an Access Token in Azure Logic App and how to call Microsoft CRM Web API or Azure Function App using this Access Token. Also, we would like to show you how to combine Logic Apps/Microsoft CRM Global Actions and Azure Function Apps depending on your requirements.
Below you find the detail guide on how to set up a connection with sample code.
Azure Application Registration
Register a new Application in your Azure environment. Open porta.azure.com using your username and password.
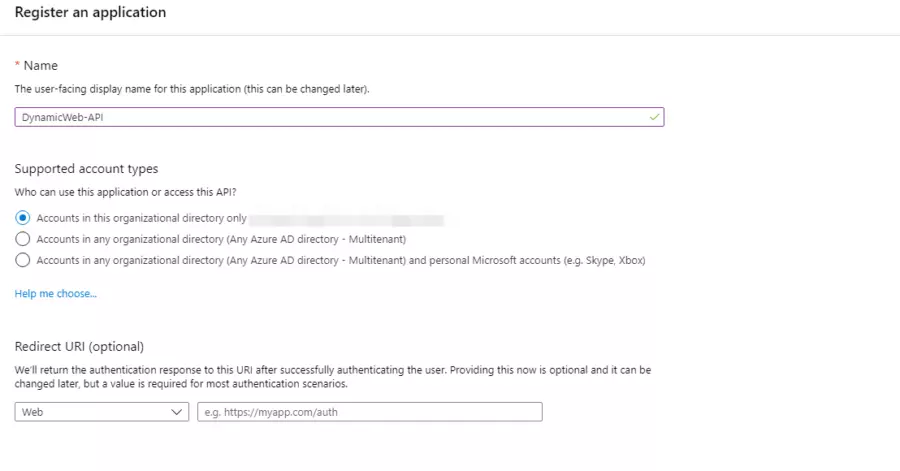
In a new window select «App Registration» and click «New Registration». A screen for registration a new application is opening.
In a new window select «App Registration» and click «New Registration». A screen for registration a new application is opening.
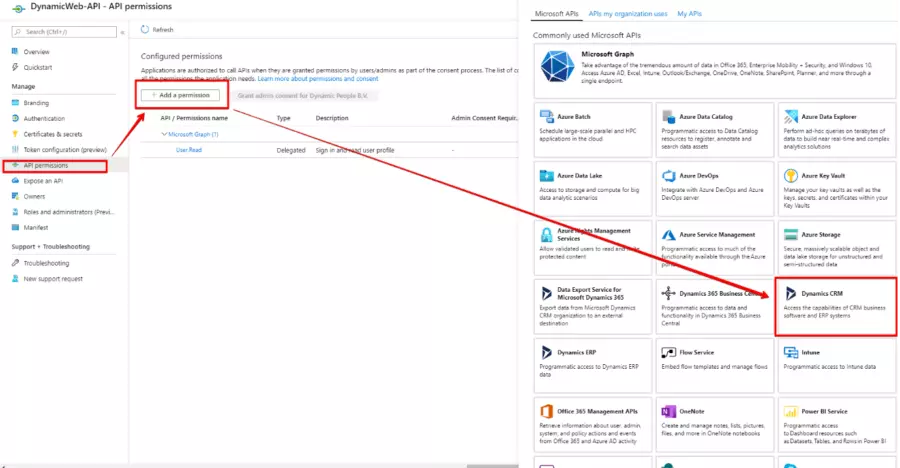
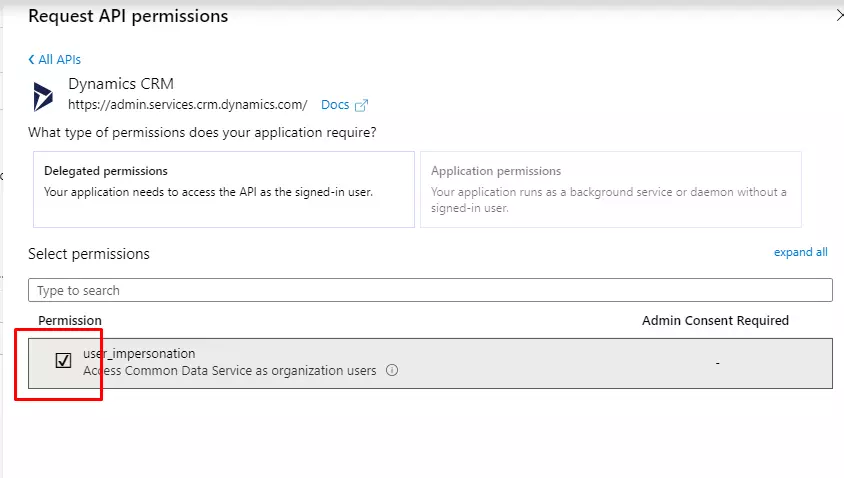
Then we need to assign Dynamics 365 service access. Open your registration you have created before and click «API permisions» in the left toolbar. Add a permission for Dynamics CRM.
The next step is to generate Certificates and Secrets. Click on «Certificates & Secrets» in the left toolbar and add a new Client Secret. Don’t forget to copy the new client secret value. If you perform another operation or leave the blade, you won’t be able to retrieve this.
Dynamics User Permission
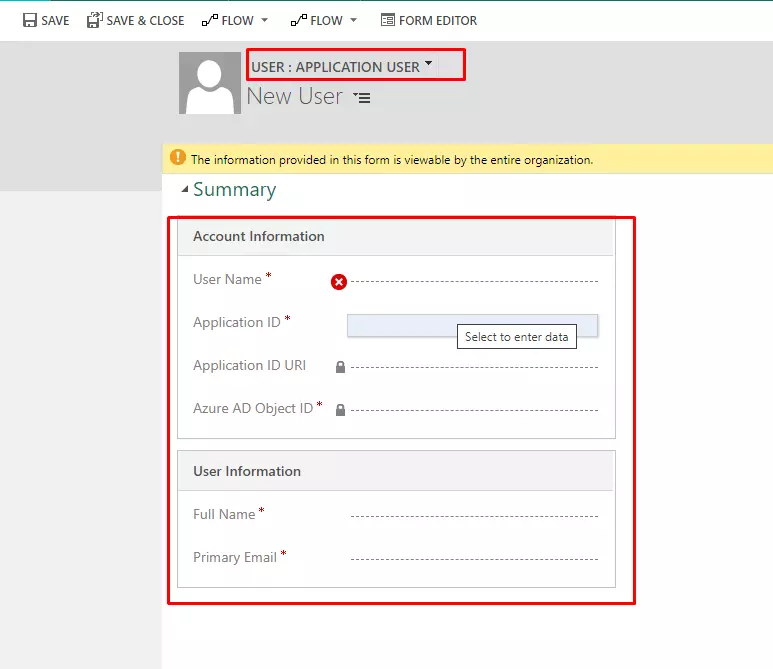
Now you need to create an Azure Application Delegated User in Dynamics 365. First copy your Azure Application ID. Now we can go to the Dynamics 365 environment. Open Application Users and create a new System User.
To create a new User, click «+NEW» and fill in all the required fields.
After the user is created, don’t forget to assign the roles using the standard functionality «Manage Roles».
Azure Logic App, calling MS CRM Global Action or Azure Function
Now it’s time to create a Logic app and receive an access token. Access tokens will be used as an input parameter for the Azure Function called Microsoft CRM WEB API for calling action or retrieving data. The example of the source code will be provided later.
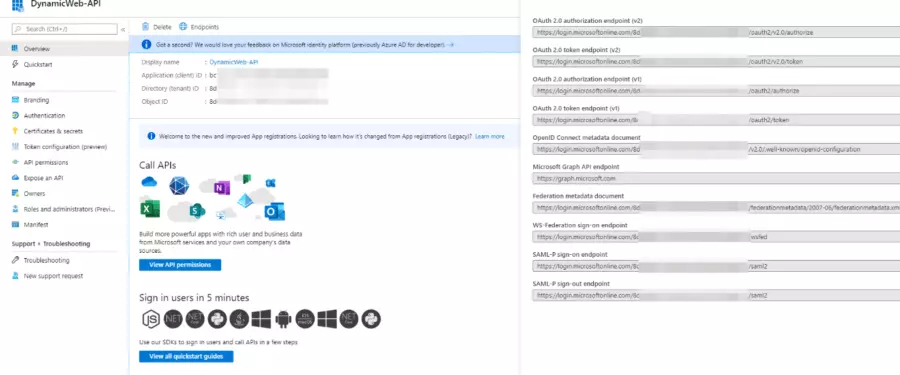
To authorize in Azure, we need the authority endpoint. An example:
We are now ready to create a Logic App in Azure and Call Azure function. Why? The answer is very simple: it’s cheaper! In Azure you should pay for each step in Logic App, where with the Function App you pay a fixed price.
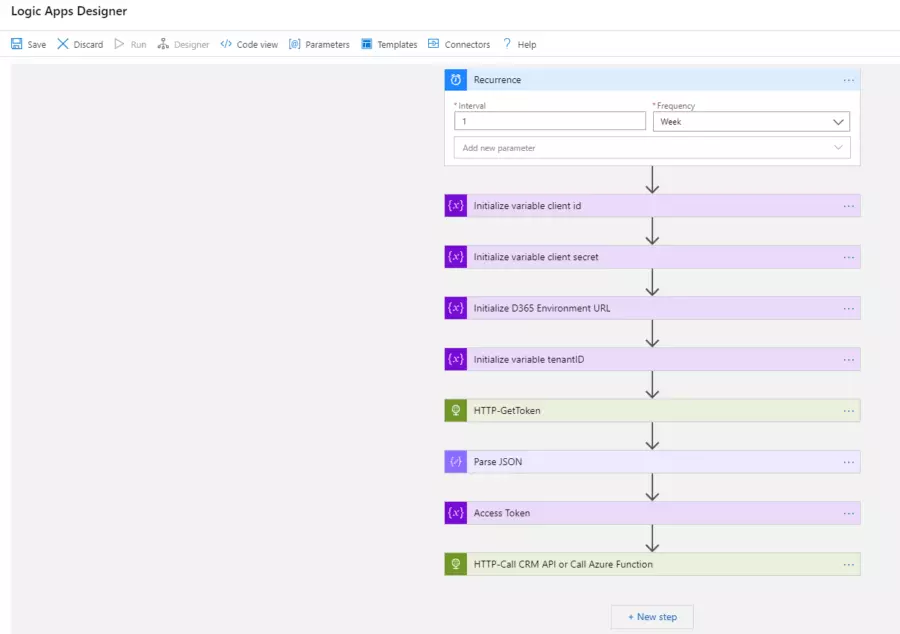
As you can see, we have very simple Logic App named: “WebAPI-LogicApp”.
Let’s explain the steps which were created in Logic App:
First of all, we initialize the variables like client Id, client secret, D365 Environment. These parameters will be required to receive an Access Token. Also we got the steps an access token. Access Tokens enable clients to securely call APIs protected by Azure. Read more information about Access Tokens here.
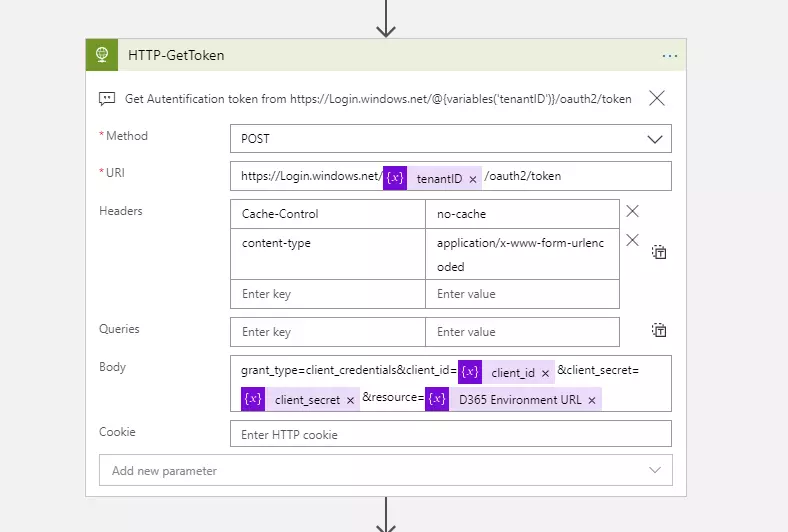
We use the parameters in the HTTP request – GetToken.
As you can see, we send the POST request to login.windows.net and provided the TenantID/ClientID and ClientSecret generated before. The variable «D365 Environment URL» is the URL from your online CRM environment.
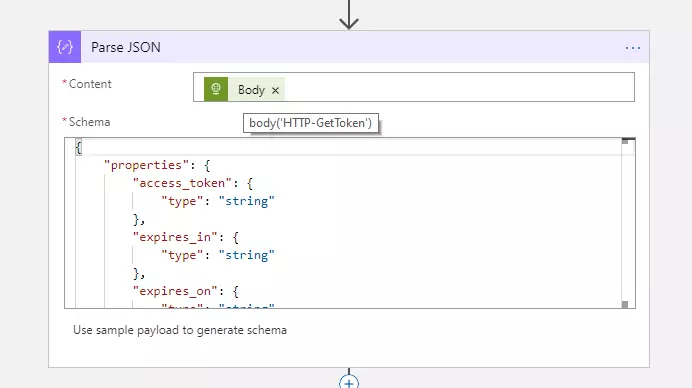
The next step is parse result JSON received from the step before.
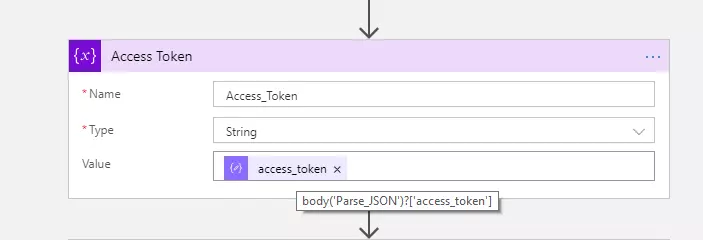
The last step to receive an Access Token is to create the new variable «Access Token» and initialize the value from «Parse JSON» step.
Now we are ready to call Microsoft CRM Global Action or Azure Function. In our example you can see how to call Global Action implemented in your CRM environment.
In the field «Body», you can provide all input parameters required for your Global Action.
Example: Call Microsoft CRM Web API using Acess Token in Azure Function
You now understand how you can call Global Action from Azure Logic app. But what to do if you need to call Azure Function App and pass Access token as input parameter? Let’s say you have a separate Function App with business logic and only one requirement: the access token and CRM Online URL, should you be provide to do any steps. In this test case I will create a Azure Function App to retrieve the Top 5 accounts from CRM and return the list of GUID’s from Azure Function App.
THE FIRST STEP – CREATE A FUNCTION APP
Below you can find the example of Function App with two input parameters (InputParametersRootObject class) and source code.
            [DataContract]
    public class TokenResponse
    {
        [DataMember]
        public string token_type { get; set; }
        [DataMember]
        public string expires_in { get; set; }
        [DataMember]
        public string ext_expires_in { get; set; }
        [DataMember]
        public string expires_on { get; set; }
        [DataMember]
        public string not_before { get; set; }
        [DataMember]
        public string resource { get; set; }
        [DataMember]
        public string access_token { get; set; }
    }
    public class InputParametersRootObject
    {
        public string Input_Resource { get; set; }
        public string Input_AccessToken { get; set; }
    }
public static class GetTop5AccountsFunction
    {
        public static string Resource { get; set; }
        public static string AccessToken { get; set; }

        [FunctionName("GetTop5AccountsFunction")]
        public static async Task Run([HttpTrigger(AuthorizationLevel.Function, "get", "post", Route = null)]HttpRequestMessage req, TraceWriter log)
        {
            log.Info("C# HTTP trigger function processed a request.");
            var data = await req.Content.ReadAsAsync();
            Resource = data.Input_Resource;
            log.Info($"Resource: {Resource}");
            AccessToken = data.Input_AccessToken;
            log.Info($"AccessToken: {AccessToken}");
            var taskGetTop5Accouns = (Task.Run(async () => await GetTop5Accouns()));
            Task.WaitAll(taskGetTop5Accouns);
            var responseString = taskGetTop5Accouns.Result;
            var jsonObject = JsonConvert.DeserializeObject(responseString);
            var builder = new StringBuilder();
            foreach (var item in jsonObject.value)
            {
                var name = item.name.ToString();
                log.Info($"name: {name}");
                var id = item.accountid.ToString();
                log.Info($"id: {id}");
                builder.AppendLine($"id: {id}");
            }
            return req.CreateResponse(HttpStatusCode.OK, $"OK. Guids: {builder.ToString()}");
        }
        private static async Task GetTop5Accouns()
        {
            using (HttpClient httpClient = new HttpClient())
            {
                httpClient.BaseAddress = new Uri(Resource);
                httpClient.Timeout = new TimeSpan(0, 2, 0);
                httpClient.DefaultRequestHeaders.Add("OData-MaxVersion", "4.0");
                httpClient.DefaultRequestHeaders.Add("OData-Version", "4.0");
                httpClient.DefaultRequestHeaders.Accept.Add(
                    new MediaTypeWithQualityHeaderValue("application/json"));
                httpClient.DefaultRequestHeaders.Authorization =
                    new AuthenticationHeaderValue("Bearer", AccessToken);
                HttpResponseMessage retrieveResponse =
                            await httpClient.GetAsync("/api/data/v9.1/accounts?$select=accountid,name&$top=5");
                if (retrieveResponse.IsSuccessStatusCode)
                {
                    var results = retrieveResponse.Content.ReadAsStringAsync().Result;
                    return results;
                }
            }
            return string.Empty;
        }
After the Azure Function App will be registered in Azure, you can find your Function App in Azure.
THE NEXT STEP – RECONFIGURE LOGIC APP
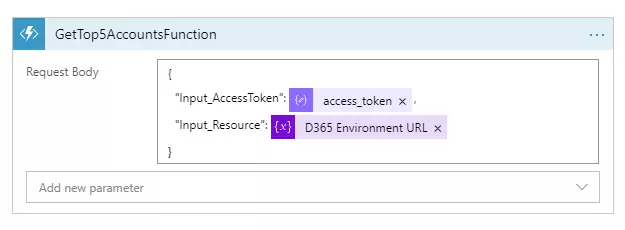
As you can see, we added a call Function App in our Logic App and provided two required parameters.
READY FOR TESTING
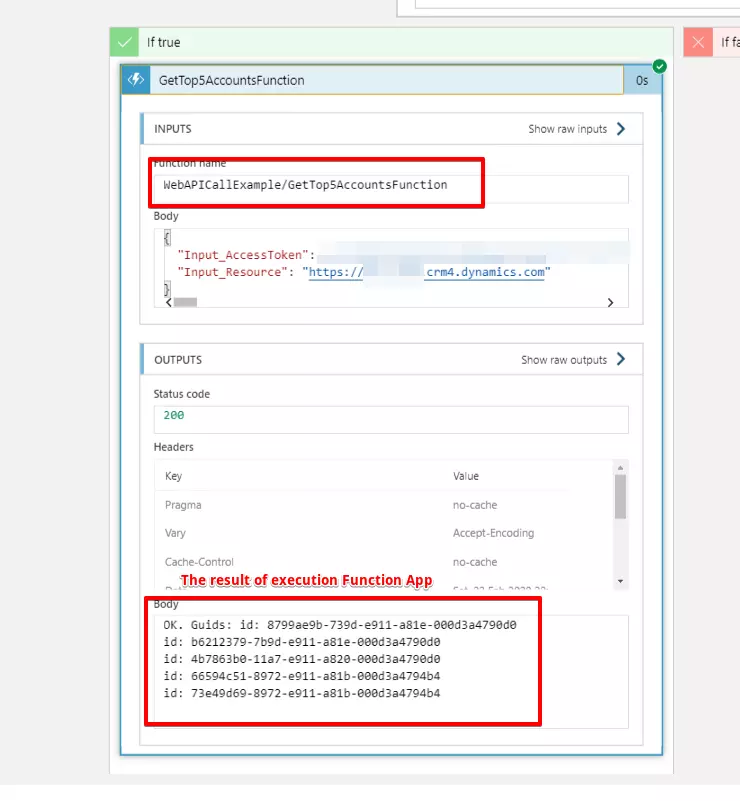
After the Azure Logic app will be saved, we are ready to test our Logic App. First of all, save Logic App and click «Run Trigger». After the Logic App will be executed, we can find the result of execution our custom Function App. In our case the business logic which were implemented in Function App was: retrieve top 5 accounts and return the list of entity Ids.
Below you find the result of execution Function App.
We hope you found this helpfull so you now can combine Logic Apps/Microsoft CRM Global Actions and Azure Function Apps depending on your requirements.


